

Simple torn books tied with twine add alittle glitter "JOY" a wreath and candle for a cute vignette.
 A table scape of white and silver.....................
This tray I purchased at the Three Speckled Hens Antiques Show in Paso Robles is a new favorite of mine....made out of and old cabinet door. Picked up the silver candle holders at Goodwill for $2.99 each, added a mercury glass one that I had and my cute little soldered box that I made at one of Terri Brushes classes.

This is a silver tray scape of white pitchers that I keep on my kitchen island that I added some holiday decor too..alittle sprig of greenery and my cute little girl image inside of the chicken wire cloche.
 Place simple vintage Christmas trees inside of silver aged cups and creamers. The littlest one with the green tree is my silver baby cup , hard to see but it is engraved with my name "JOY" perfect for the season.....

with that I got the idea to stencil the number "25" on my bags that I made to hold my ornaments for an exchange that I doing...I think they came out cute!

Close up....

Last but not least...my latest purchase of a pair of old ice skates that I placed at the base of my mantle along with a poinsettia.

 Next pick your favorite towel for the main piece of towel and pick a matching towel which will be the ruffle. I laid it out so you can see the contrast between the two towels.
 Note that you will have finished edges on both right and left sides and across the bottom. It will measure 18" in width.
 You will then mark it into thirds or at 6" from each edge. I used a disappearing ink marker to mark my towel. Then cut into three pieces each one is 6" wide. You will use only the two pieces with the finished edges, discarding the middle piece. I like wide ruffles so I chose to cut them at 6" but if you want a smaller ruffle you can cut to your desired width. Now set that aside for now.
 Next you can choose from a couple of options , I wanted to put an image on my towels so I printed out my image onto fabric. I found the most wonderful images from
  The fabric sheets have a backing you peel away leaving a very soft and flexible piece of fabric to work with.
 Now get your ruffle piece and stitch across raw edge length wise using a basting/gathering (long stitch) at 1" and then again at 1/2" (note: leaving long ends of thread on both sides to gather with, do not back stitch) now gather the ruffle by pulling together the top threads only on each side and pin to the bottom edge of your main towel (as shown in picture above). Knot both ends of thread by tying behind ruffle as shown below.
  Then using a zig zag stitch , sew right between the two rows of gathering to stitch ruffle to your towel. No need to finish the top edge, as it gives it a very vintage feel, but you can if you do not care for this raw look.
 You can then add a bit of vintage lace over the top if you so desire.
 Here is what your towel will look like when complete.
 Now I will show you another option. You can use Tee shirt iron on transfers to print out your designs then you cut around design and following directions on the package iron on your image for a different look.
 I chose this Christmas Birdcage design to make some cute Christmas towels.......
 Make your ruffle the same manner as above but if you want you can add some cute little buttons over your lace. Or .........
 Maybe just a simple little red button for some added color. That is the best part about these, you can embellish them however you want too! Wouldn't these make great gifts ????? Isn't this a cute towel.....

 These are plain and simple towels that match my kitchen.
 These are fun , quick and easy to make... I hope you have enjoyed this tutorial.

 And all the lovelies inside the box, a little fall pillow, an old thread spool with dreamy lace on it, decorated thread spools, and bric a brac....
 Some old buttons and beautiful flowers too!
 These three little thread spools decorated with flowers, lace , ribbon and bling...love them!
 And this beautiful tussie mussy full of lace and a a white pumpkin, I already hung up to display.....
 Last but not least....of course I saved my favorite thing for last...is this darling canvas with the witches on it and the words read "He...He...He" this is SOOoooo me! Isn't it just so stikin cute??? Of course it is also already displayed proudly in my home with all my other Halloween decorations...
 I took this PIC of her and Tiffany at Tiffany's home, her bedroom to be exact. What a beautiful home she has, every room just arranged to perfection. I am sure Jo gets asked so much to have her picture taken I was alittle remiss about asking too much,but I did click off a couple. We had a wonderful dinner cooked by Ms. Tiffany and had such a wonderful time hearing about Jo's adventures and Tiffany's crazy busy life. When we awoke in the morning it was misting and overcast, we walked outside only to see the most amazing sight.....spider webs everywhere..I mean everywhere, on trees and bushes all around....now who would of thought that Jo Packham would have been so amazed with this sight (as she sees the most amazing things on a daily basis) but she was just looking and laughing and asked Tiffany to take some pics for her...of course her camera is just a little nicer than mine..he..he...but I did manage to get a couple of good shots.
 On our way to art camp we stopped over in Portland and did some shopping...when I got a call from Tiffany asking if Karen and would like to join her and Jo for dinner....ARE YOU KIDDING! What time we will be there.....so we got to spend some more time talking and enjoying her company, really she is just so sweet! Then on our way to Art Camp where we met up again with Tiffany and Jo.....Here is a pic of Tiffany and I , we were trying to show off our outfits that were very similar..do you think?


 The we made this box and the tree inside while we waited for our angels to cook.
 When they came out of the oven we painted them and put them in our boxes...

 Lastly the soldered crown...this was amazing, I did not think I could do this with all these round pieces..but I did! First step to wrap all of the parts then lay out your design.
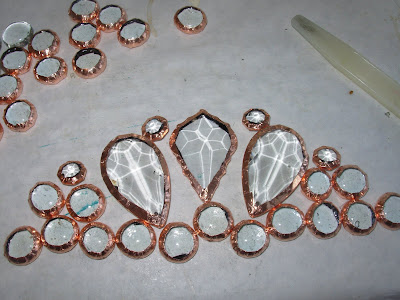 The start with making a circle...not so easy.....
 But it all came together somehow...I did not quite finish but will add some more at home but I like it so far......
 I had such an amazing time.....and so glad to have spent some time with Tiffany , she is an amazing , wonderful woman who I am so glad to call my friend.....


